Vue.js Chatbot - Part 3: GPT-3.5 and MongoDB
Generated with DALL-E 3
It can be daunting to get started on creating your own custom webapp, especially if you’re not a web developer. There are lots of nice design tools out there, but you lose some of the granular control if you don’t code it yourself. As someone who’s not a web developer, I’ve found that Vue.js is a great framework to get started with. It’s easy to learn, and has a lot of great documentation and community support. In this series, I’ll be showing you how to build a chatbot using Vue.js, and how to integrate it with a back-end API that will be interacting with the GPT-3.5 model. As a cherry on top, we will look at how to store the messages in a MongoDB database, so that we can use them later for other uses.
If you want to jump straight to the finished product, you can find it at the code repository here.
If you missed part 1, or part 2, check them out before jumping into this part!
What is GPT-3.5?
GPT-3.5 is a Large Language Model (LLM) from OpenAI, which has a powerful ability to generate natural language. We can use this model to generate new text based on a prompt that we give it. For example, if we give it the prompt “Hello, my name is Lance and I am a Ph.D. Student. I like to”, it will generate a list of possible endings to the sentence. We are going to interact with the instruction-tuned version of the model called ChatGPT, which was fine-tuned on a dataset of chatbot conversations. This makes it particularly useful for our purposes.
Talking to GPT-3.5
Most of our work now will be on the back-end of our application as we need to write ways to interact with OpenAI’s API. We will be sending requests to their API to receive chat responses based on the messages that we send it. The first thing that we need to do is obtain an API key from OpenAI. You can do this by signing up for an account on their website. New users get $5 of free credits, which is enough to test out the model for a while.
Before you create a new API key, create a new file at the root of your project directory, named .env. Inside it we will store our API key as an environment variable. This is a good practice to get into, as it allows us to keep our API key secret, and not accidentally commit it to our code repository (so long as .env is in your .gitignore!). Inside the .env file, add the following line:
.env
OPENAI_API_KEY=YOUR_API_KEY_HERE
Now you can create a new API key at this page and paste it into the .env file, replacing YOUR_API_KEY_HERE. With that setup, we can start adding the code in main.py to interact with the OpenAI API.
Replace the contents of main.py with the following:
main.py (updated)
from fastapi import FastAPI, Request, WebSocket, WebSocketDisconnect
from fastapi.staticfiles import StaticFiles
from fastapi.templating import Jinja2Templates
import json
import os
import openai
from dotenv import load_dotenv, find_dotenv

messages = [{'role': 'system', 'content': 'You are a helpful assistant'}]

# Get the API key from environment variables
_ = load_dotenv(find_dotenv())  # read local .env file
openai.api_key = os.environ["OPENAI_API_KEY"]

# Create a OpenAI ChatGPT completion function
def get_chat_response():
    global messages
    response = openai.ChatCompletion.create(
        model="gpt-3.5-turbo",
        messages=messages,
        temperature=0.7
    )
    messages.append({'role': 'assistant', 'content': response.choices[0].message['content']})

app = FastAPI(debug=True)

# Set static file location
app.mount("/assets", StaticFiles(directory="app/dist/assets", html=True), name="static")

# Setup Jinja2 templates to serve index.html
templates = Jinja2Templates(directory="app/dist")

# Serve index.html template from the root path
@app.get("/")
async def root(request: Request):
    return templates.TemplateResponse("index.html", {"request": request})

# Create a websocket connection
@app.websocket("/ws")
async def websocket_endpoint(websocket: WebSocket):
    await websocket.accept()
    try:
        while True:
            data = await websocket.receive_text()
            message_data = json.loads(data)
            print(message_data)
            if message_data['type'] == 'get_messages':
                return_message = {'type': 'message_update', 'content': messages[1:]}
                print(return_message)
                await websocket.send_text(json.dumps(return_message))

            if message_data['type'] == 'new_message':
                new_message = message_data['content']
                messages.append({'role': 'user', 'content': new_message})
                get_chat_response()
                return_message = {'type': 'message_update', 'content': messages[1:]}
                print(return_message)
                await websocket.send_text(json.dumps(return_message))

            if message_data['type'] == 'clear_messages':
                messages.clear()
                messages.append({'role': 'system', 'content': 'You are a helpful assistant'})
                return_message = {'type': 'message_update', 'content': messages[1:]}
                print(return_message)
                await websocket.send_text(json.dumps(return_message))

    except WebSocketDisconnect:
        print("Client disconnected")

if __name__ == "__main__":
    import uvicorn
    uvicorn.run(app, host="0.0.0.0", port=8000)
This code has a bit more going on at the front that we had before, so let’s break it down. First, we are importing the package openai so that we can utilize their API. We also import os and dotenv so that we can read our API key from the .env file. Next, we set the openai.api_key parameter equal to the environmental variable OPENAI_API_KEY which comes from your .env file. Next, we create a function called get_chat_response() which will be used to send a request to the OpenAI API to get a response from the model. Then down in the websocket endpoint notice that we are calling this function when we receive a new message from the user. Lastly, notice that we add a system prompt as our initial message to tell the model how to behave. This is important, as it will help the model to generate more relevant responses.
Now, if you rebuild your webapp with npm run build in the app/ directory and then run python main.py in the root directory, you should be able to chat with an actual AI bot!
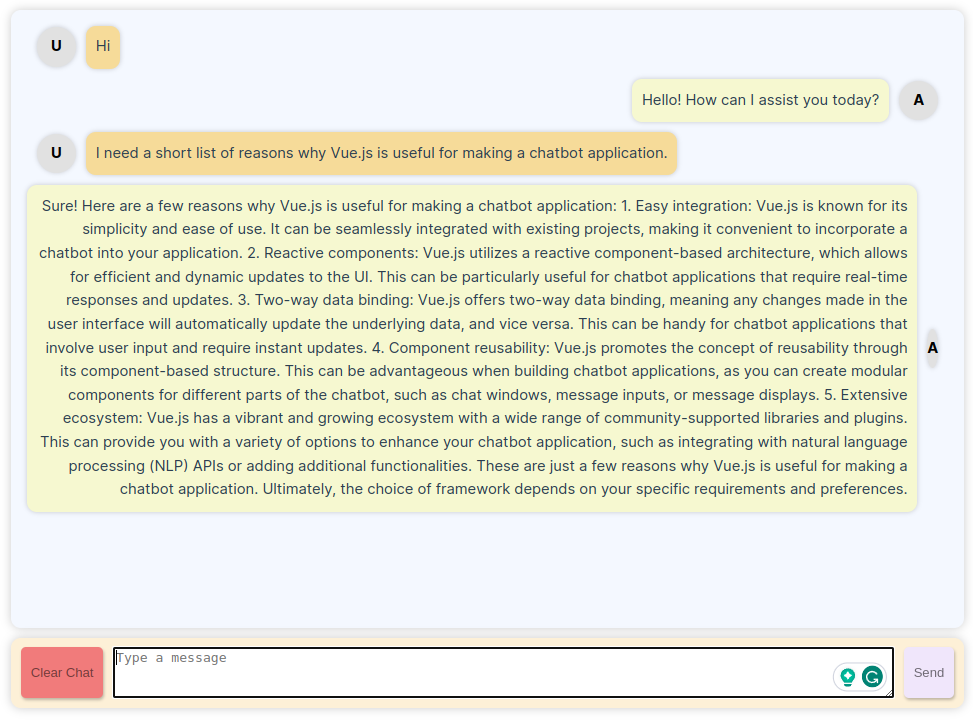
The chatbot is alive!
As it stands, the chatbot has a bug. It doesn’t show the user message right away when they send it. We will fix this later by returning the message data from the websocket endpoint immediately when the user submits new messages. Furthermore, there are some styling issues that we will need to work out. Let’s do that.
Fixing some bugs
First, maybe you noticed that when you press enter to send a message, it also creates a newline in the text box. We can fix this through some JavaScript in InputRow.vue. Modify your sendMessage() function InputRow.vue script to look like this.
InputRow.vue (updated)
async sendMessage(event) {
    // If the user presses enter, prevent the default form action
    if (event) {
        event.preventDefault();
    }

    if (this.messageContent.trim() !== '') {

        const newMessage = {
            type: 'new_message',
            content: this.messageContent,
        };
        this.sendSocketMessage(newMessage);
        this.messageContent = '';
    }
}
We are now checking the event when a new message is sent, if the event exists, we prevent the default action. In our case, the event is the user pressing enter. This will prevent the newline from being added to the text box.
Next, let’s fix those squished avatar circles. Modify your ChatBubble.vue component style code to look like this.
ChatBubble.vue (updated)
.chat-bubble {
    display: flex;
    align-items: center;
    flex-direction: row;
    margin-bottom: 10px;
}

.chat-bubble.assistant {
    flex-direction: row-reverse;
}

.chat-bubble-avatar {
    flex-shrink: 0;
    background-color: #e1e1e1;
    border-radius: 50%;
    color: #000;
    font-weight: bold;
    height: 40px;
    width: 40px;
    line-height: 40px;
    margin-right: 10px;
    text-align: center;
    margin: 0px 10px;
    box-shadow: 0 0 5px rgba(0, 0, 0, 0.2);
}

.chat-bubble-content {
    border-radius: 10px;
    padding: 10px;
    box-shadow: 0 0 5px rgba(0, 0, 0, 0.2);
    max-width: 80%;
}

.user .chat-bubble-content {
    background-color: #f6db99;
}

.assistant .chat-bubble-content{
    background-color: #f6f8d0;
}
We are now setting the flex-shrink to 0 for the avatar, which will prevent it from shrinking when the screen size is small. We also set the width and height to 40px. Lastly, for the content we set the max-width to 80% so that it doesn’t take up the whole screen.
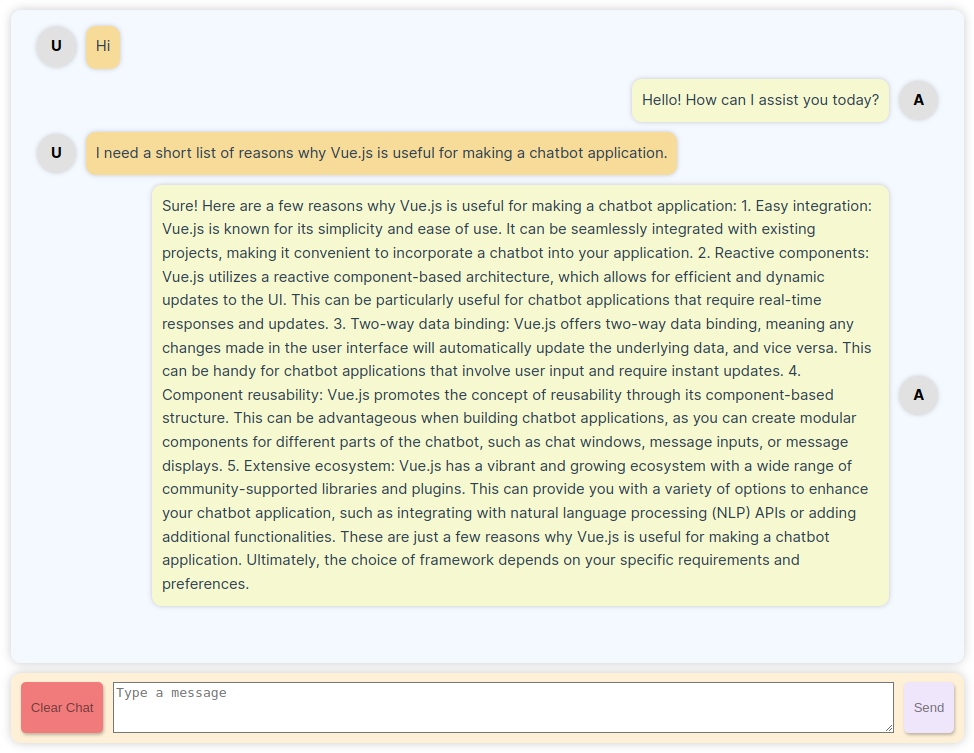
Looking much better
Now it’s time for MongoDB!
What is MongoDB?
MongoDB is a NoSQL database that stores data in JSON-like documents. It is a great database for storing data that doesn’t have a fixed schema, and is very easy to get started with. We will be using MongoDB to store the messages that our chatbot receives, so that we can use them later for other purposes. For example, we could use the messages to train a new chatbot model, or to analyze the conversations that the chatbot has with users.
Setting up MongoDB
First, if you want to have it running with your current prototype, you will need to install MongoDB on your system and have it running in the background. You can find instructions for installing MongoDB on your system here. Once you have it installed, you can start the MongoDB server by running mongod in your terminal.
If you would rather not go through the headache of installing MongoDB, you can sit tight and wait for us to Dockerize our application later this in part. We will be using Docker Compose to run MongoDB in a container, so that you don’t have to install it on your system.
Connecting to MongoDB
Now that we have MongoDB running, we need to connect to it from our application. We will be using pymongo to connect to the database in our back-end, so you will first need to install it with pip install pymongo. Then, we can replace the contents of main.py with the following.
main.py (updated)
from fastapi import FastAPI, Request, WebSocket, WebSocketDisconnect
from fastapi.staticfiles import StaticFiles
from fastapi.templating import Jinja2Templates
import json
import os
import openai
from dotenv import load_dotenv, find_dotenv
from pymongo import MongoClient

# Connect to MongoDB
client = MongoClient('mongodb://127.0.0.1:27017/')
db = client['vue-chatbot']
messages_collection = db['messages']
messages_collection.delete_many({}) # Clear the messages collection
messages_collection.insert_one({'role': 'system', 'content': 'You are a helpful assistant'}) # Add a system message

# Get the API key from environment variables
_ = load_dotenv(find_dotenv())  # read local .env file
openai.api_key = os.environ["OPENAI_API_KEY"]

# Create a OpenAI ChatGPT completion function
def get_chat_response():
    messages = get_messages()
    response = openai.ChatCompletion.create(
        model="gpt-3.5-turbo",
        messages=messages,
        temperature=0.7
    )
    messages_collection.insert_one({'role': 'assistant', 'content': response.choices[0].message['content']})

def get_messages():
    messages = list(messages_collection.find({}))
    for message in messages:
        message.pop('_id')
    return messages

app = FastAPI(debug=True)

# Set static file location
app.mount("/assets", StaticFiles(directory="app/dist/assets", html=True), name="static")

# Setup Jinja2 templates to serve index.html
templates = Jinja2Templates(directory="app/dist")

# Serve index.html template from the root path
@app.get("/")
async def root(request: Request):
    return templates.TemplateResponse("index.html", {"request": request})

# Create a websocket connection
@app.websocket("/ws")
async def websocket_endpoint(websocket: WebSocket):
    await websocket.accept()
    try:
        while True:
            data = await websocket.receive_text()
            message_data = json.loads(data)
            if message_data['type'] == 'get_messages':
                messages = get_messages()
                await websocket.send_text(json.dumps({'type': 'message_update', 'content': messages[1:]}))

            if message_data['type'] == 'new_message':
                new_message = message_data['content']
                messages_collection.insert_one({'role': 'user', 'content': new_message})
                messages = get_messages()
                await websocket.send_text(json.dumps({'type': 'message_update', 'content': messages[1:]}))
                get_chat_response()
                messages = get_messages()
                await websocket.send_text(json.dumps({'type': 'message_update', 'content': messages[1:]}))

            if message_data['type'] == 'clear_messages':
                messages_collection.delete_many({})
                messages_collection.insert_one({'role': 'system', 'content': 'You are a helpful assistant'})
                messages = get_messages()
                await websocket.send_text(json.dumps({'type': 'message_update', 'content': messages[1:]}))

    except WebSocketDisconnect:
        print("Client disconnected")

if __name__ == "__main__":
    import uvicorn
    uvicorn.run(app, host="0.0.0.0", port=8000)
First we import MongoClient which will allow us to establish the connection with the database. Then, we create a new client object and connect to the database. We also create a new collection called messages and clear it out so that it has no existing messages in it (we could not do this in the future if we want to store the history). Lastly, we add a system message to the database so that we have something to start with.
We also modify get_chat_response() to use the database for receiving and storing messages. Furthermore, we create a new function, get_messages() whose job is to retrieve the messages from the database. Further down in the code, we use this function in our websocket endpoint to send the messages to the front-end. The rest of the websocket endpoint is modified to interact with the database to get, insert, and delete messages where appropriate.
With that, we are now storing our messages in a MongoDB database! You can start the app with python main.py. If you want to check out the database, you can do so by running mongosh in your terminal. This will open up a MongoDB shell where you can run commands to interact with the database. For example, you can run show dbs to see the databases that are available. You should see vue-chatbot in the list. You can then run use vue-chatbot to switch to that database. Then, you can run show collections to see the collections that are available. You should see messages in the list, and can then run db.messages.find() to see the messages that are stored in the database.
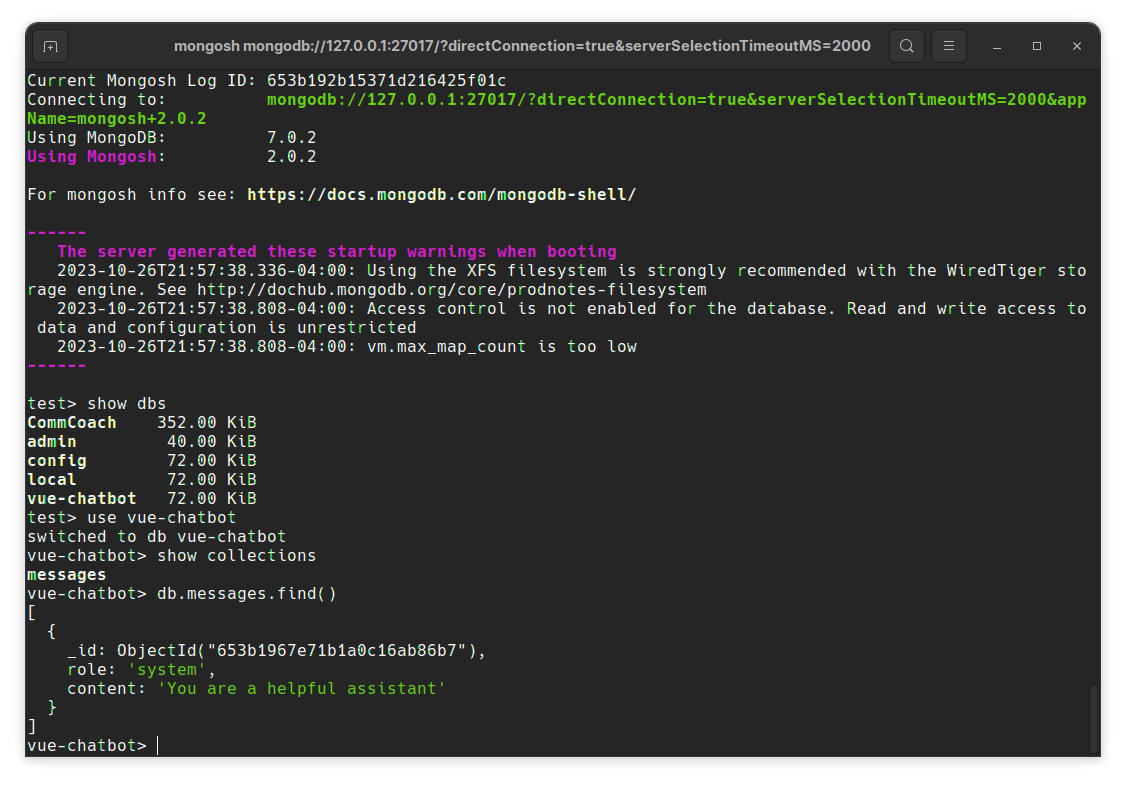
MongoDB running!
Dockerizing our application
Now that we have our application working, we can Dockerize it so that we can easily deploy it to a server or if we don’t want to go through the hassle of installing every application and package on our system. This also makes it really useful for working with other people who are on different systems (Windows, macOS, Linux) as we can all run the same Docker container. We will be using Docker Compose to run our application in a container. Docker Compose allows us to run multiple containers at once, which is useful for our application as we need to run MongoDB and our application at the same time.
You will need to have Docker and Docker Compose installed on your system to follow along. Instructions for installing Docker can be found here. You can also find instructions for installing Docker Compose here.
First, we need to create a new file in the root directory called docker-compose.yml. This file will contain the instructions for Docker Compose to run our application. Add the following to the file.
docker-compose.yml
version: '3'

services:
  webapp:
    build:
      context: .
      dockerfile: Dockerfile
    ports:
      - "8000:8000"
    depends_on:
      - mongodb
    environment:
      - MONGO_URI=mongodb://mongodb:27017

  mongodb:
    build:
      context: .
      dockerfile: Dockerfile.mongo
    ports:
      - "27017:27017"
This file contains the instructions for Docker Compose to build and run our application. We will be using two Dockerfiles to build the two different containers, one for our application and one for MongoDB. The webapp service will be built from the Dockerfile and will be accessible on port 8000. It will also depend on the mongodb service, which will be built from the Dockerfile.mongo file and will be accessible on port 27017. We also set the MONGO_URI environment variable to mongodb://mongodb:27017 which will allow our application to connect to the MongoDB database.
Next, we need to create the Dockerfile and Dockerfile.mongo files. Create a new file called Dockerfile in the root directory and add the following.
Dockerfile
FROM python:3.11

# Set the working directory to /app
WORKDIR /app

# Install any needed packages specified in requirements.txt
COPY requirements.txt .
RUN pip install -r requirements.txt

# Copy the current directory contents into the container at /app
COPY . .

# Make port 8000 available to the world outside this container
EXPOSE 8000

# Run main.py when the container launches
CMD ["python", "main.py"]
This file contains the instructions for Docker to build our application container. It starts with a base image of Python 3.11. Then, it sets the working directory to /app and installs the packages specified in requirements.txt (which is a combination of all the pip installs that we have been performing. See the GitHub repo for this file). Next, it copies the contents of the current directory into the container at /app. Then, it exposes port 8000 to the outside world and runs main.py when the container launches.
Next, create a new file called Dockerfile.mongo in the root directory and add the following.
Dockerfile.mongo
FROM mongo:latest

# Run mongod when the container launches
CMD ["mongod", "--bind_ip_all"]
This one is a lot simpler. It starts with a base image of the latest version of MongoDB. Then, it runs mongod when the container launches.
Lastly, we need to modify our main.py file to use the MONGO_URI environment variable. Replace the top of main.py with the following.
main.py (updated)
from fastapi import FastAPI, Request, WebSocket, WebSocketDisconnect
from fastapi.staticfiles import StaticFiles
from fastapi.templating import Jinja2Templates
import json
import os
import openai
from dotenv import load_dotenv, find_dotenv
from pymongo import MongoClient

# read local .env file
_ = load_dotenv(find_dotenv())

# Connect to MongoDB
uri = os.environ["MONGO_URI"]
client = MongoClient(uri)
db = client['vue-chatbot']
messages_collection = db['messages']
messages_collection.delete_many({}) # Clear the messages collection
messages_collection.insert_one({'role': 'system', 'content': 'You are a helpful assistant'}) # Add a system message

### Rest of your code here ###
We are now reading the MONGO_URI environment variable from the .env file. This will allow us to connect to the MongoDB database from our application.
Now, we can build and run our application with Docker Compose. First, ensure that you have built the latest version of your front-end by navigating to the app/ directory and running npm run build. Then, run docker-compose up --build at the project root directory. This will build the two containers and run them. You should see the output of the two containers in your terminal. Now, you can access the application at localhost:8000 and the MongoDB database at localhost:27017. You can also run docker-compose down to stop the containers.
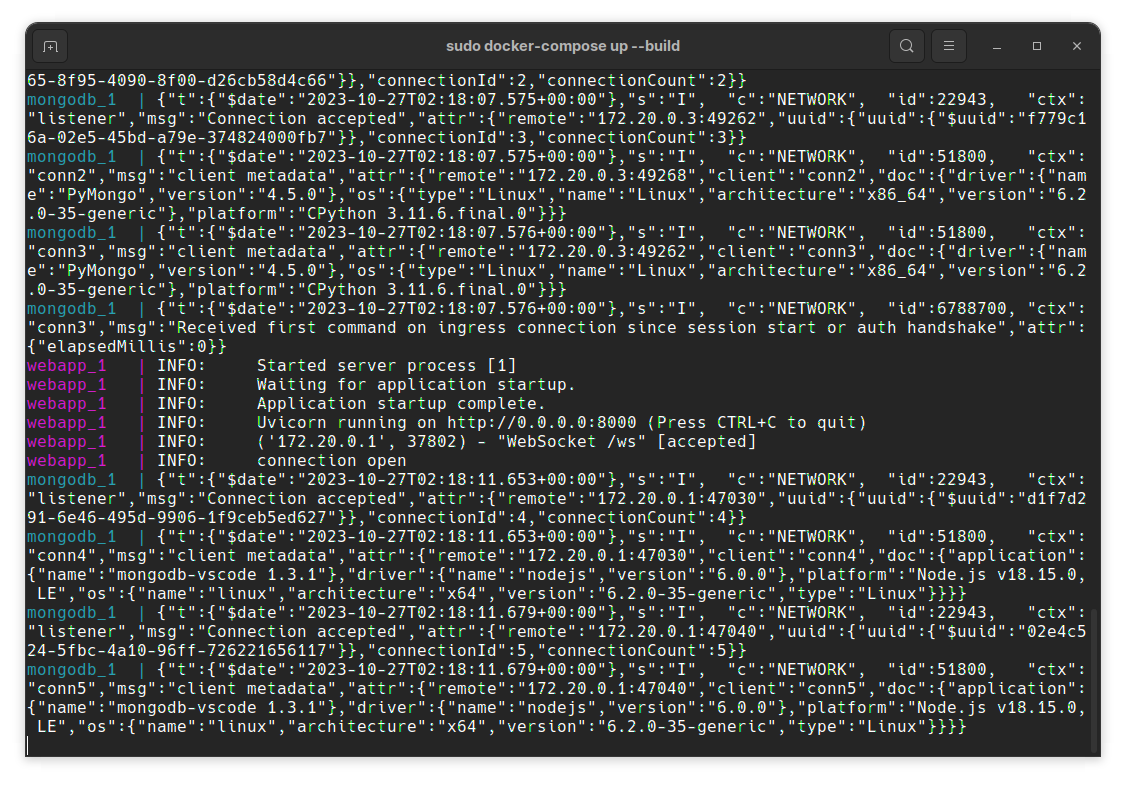
Dockerized and ready to go!
Conclusion
It was a long journey, but we worked our way through creating a front-end using Vue.js in the first part, linking it up to a FastAPI back-end in the second part, and finally linking it up to a real AI. Lastly, we created a way to store our messages in a MongoDB database and deploy it easily. I hope that you learned something along the way, and that you are inspired to create your own chatbot!
Enjoy Reading This Article?
Here are some more articles you might like to read next: